
Lincoln County Raceway Layout

Outgrid
The outgrid at Lincoln County Raceway is a full covered grid comprising two side-by-side full capacity 40 kart grids. Exit from the outgrid is controlled by two swinging gates that lead onto the main front start/finish straight.
On the left side of the grid is a shed for the grid marshal along with a running order board complete I flashing lights to indicate the classes on the grid.
Alongside the grid is ample space for the storage of starters and pit crew. There is a dedicated area for the storage of pit trolleys at the rear of the grid.


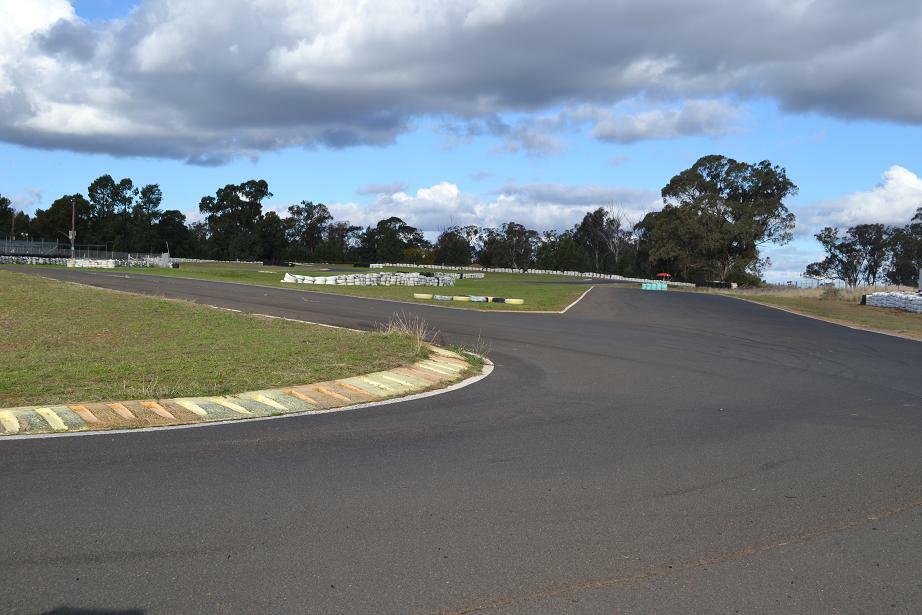
Main Straight
The main straight at Lincoln County Raceway is approximately 165metres in length and runs from the outgrid (or turn 15) to turn 1. The straight is the start/finish straight and the main location for spectators. it houses most of the track facilities along its outskirts.
The main straight has one of the 3 magnetic timing strips in it and also has the timing loop used with the transponder timing system. It has the race control tower and start tower located about halfway down. along this straight racers will see the laps remaining displayed on the starter tower and will also see the last lap board across the track indicating that all important last lap.


Turn 1
Turn 1 is a tricky double apex left hander at the end of the main straight. Braking and entry into this corner are very important with kart travelling up to 100km/h on approach to the turn. A wide entry is needed to get into the first apex and set up the second. Running a little wider off the first apex allows a tighter turn into the second apex and a better setup into Turn 2, however, run too wide and you'll quickly see your competitors turning inside of you. The exit from the second apex is very important as it will determine the speed and line you can take into Turn 2.


Turn 2
Turn 2 is a quick right-hander, the speed and angle of the entry are very much determined by the exit you got off the second apex of Turn 1. This corner is important as it can set up a good passing move at Turn 3, whether you're on the giving or receiving end depends on your run through this corner.
Turning in a bit tighter has its reward making the swap to the right side of the track easier to run into Turn 3, however, if you're too slow out of the corner and your competitors will get an easy drive down the left side and push you out of the 3rd turn.


Turn 3 (Subaru)
Turn 3, known to locals as 'Subaru', is a tight left-hand hairpin type turn that presents a good passing opportunity. To get a pass done here you need to be quick out of Turn 2 and get down the left side of your competitor, a big application on the brake will get you inside of them and will also mean you can press them outside and hopefully get the run to Turn 4/5.
The entry to this corner is quite wide, as can be seen from the marks on the grass on the approach, however, get too wide and you'll be grabbing the brakes on the grass and will more than likely finish your race there.


Turn 4 & 5 (The Flip-Flop)
Turn 4 & 5, known as the flip-flop, is a right-left combination that requires a quick change of direction between the two corners. The best course of action for these turns appear to be to turn tighter into Turn 4 and minimise the run out of the turn in order to open up the apex of Turn 5. If done correctly you will be able to get the power and accelerate right through Turn 5 and onto the back straight. Be careful not to run too wide out of Turn 5 though as there is a chain popping drop off on the right side of the track leading onto the rear straight.
On the entry of Turn 4 you will find the A-track cut-thru, and on the exit of Turn 5 is the B-track cut-thru.


Turn 6 & 7
Turn 6 & 7 are a fast left-right combination as you travel up the back straight. There is no need to brake, lift or anything for these turns, however, the angle of travel through them makes a big difference to the setup for the approach to the fast Turn 8. You can more-or-less straight line these corners however try and get in on the kerb and stay on the right on the exit of Turn 7 in order to set up Turn 8.


Turn 8
Turn 8 is a hair-raising ride across the top of the hill and runs to the tightest corner on the track at Turn 9. In that regard this corner, although great fun it is extremely important in setting up the run right through Turn 9. This fast left-hander can be taken at great speed and karts will slide their way up to the turn in for turn 9. It's a great action spot for the spectator, who can stand on the hill on the exit to the corner. The exit of the corner can be difficult to judge as the approach to Turn 9 is blind behind a crest on the exit of Turn 8.
This corner does present a passing opportunity for those brave enough to get under the competition and ride the kerb, be warned though this move can be disastrous for all involved if you don't get it right.
It is possible to hold the throttle wide open through the corner...are you brave enough??


Turn 9 (The Hairpin)
Turn 9 is the tightest corner on the track, this hairpin left-hander is possibly the most important corner on the track, not for it's passing abilities but due to its ability to make or break your speed on the end of the back straight and start of the important middle straight down the hill.
The approach to Turn 9 from turn 8 is blind with a slight crest from the hill being between the corners. There are many different lines through this corner, from braking early and turning in, to rolling up to the apex before turning in, either way, this corner is one tricky one to get right. The exit speed of this corner will dictate whether you're in a position to make the most of the coming up passing opportunities at Turns 14 and 15.


Turn 10
Turn 10 is right on the exit of Turn 9, this right-hander is not particularly difficult to navigate, however, is greatly affected by the line and speed from Turn 9. On the exit of Turn 9, it's best to slide out to the kerb and apex of Turn 10, run over the inside kerb and out to the left side of the track for the run to Turns 11 and 12. A word of warning thou, don't grab too much of the kerb too early as your guaranteed to lose your chain and take a seat on the side of the track. On the up side, it's nice and close for the walk to the its.


Turn 11 & 12 (Harris Bends)
Turn 11 and 12 are known as Harris Bends. Harris Bends is a quick right-left combination coming down the hill on the fast middle straight. The bends can be taken at full throttle without backing off, however, the angle is important to set up Turn 13 and onto 14 at the end of the straight. Grabbing a little of the kerb on the inside of Turn 12 will allow a straighter run thru Turn 13 and into Turn 14, this is especially important if your aim is to get down the inside of your competitor into Turn 14.
On the left of the exit of Turn 12 you'll see the B-track rejoin where the B-track cut-thru joins the C-track.


Turn 13
Turn 13 is a fast left-hand kink in the middle straight. This corner also forms part of the apex/exit of the b-track cut-thru. Feel free on the ride through this high-speed corner to grab as much of the inside kerb as you like, it's possible to cut this corner so much that you are floating across the grass on the inside. Be warned thou on a dewy morning you'll most likely end up backwards in the tyres or across the track to Turn 14.
The speed and angle through this corner is important to setup the great passing opportunity in Turn 14.


Turn 14
Turn 14 is a wide right-hand 180-deg turn at the end of the middle straight. This corner presents a great passing opportunity if close enough, or use it to set up a pass on the final corner at Turn 15. A wide entry on this turn is beneficial as it opens up the corner and allows you to open the corner through to the exit. On the approach to the corner you will notice the exit of the A-track cut-thru, this presents to an opportunity to get out even wider on the track by utilising this extra space to turn in, provided that your angle out of Turn 13 was good enough. Due to this wide entry point, if you're going to get the pass done you need to be in deep and early, or your competitor is likely to cut your nose off as you go in.


Turn 15
Turn 15 is similar to Turn 14, however, is a left-hander instead. The same principles apply, and a wide entry again presents itself with the entry to the ingrid being on the outside of the corner. Turn 15 presents another great passing opportunity, especially on that all-important last lap. Turn 15 is the final corner before you come onto the 165metre main straight, so obviously the entry and exit greatly dictate your speed to the straight and the possibility of a pass down the straight or into Turn 1.
Like turn 14 if your going to pass here, you need to be in early and deep, or your competitor will slam that door shut.


The Ingrid
The entrance to the ingrid is located on the outside on the approach of Turn 15. Entry to the ingrid is governed by 3 tyre walls creating a chicane to slow karts on the way in. The ingrid is capable of holding the entire 40 kart grid (pending on peoples parking abilities).
Alongside the end of the ingrid is the scales area, with the technical inspection shed and impound alongside.
Exit from the ingrid is via a gate to the right which goes back into the pit area near the undercover pits.


Mechanical Breakdown Lane
The of the mechanical breakdown lane runs from just inside the entrance to the ingrid to the exit of the outgrid. although typically not used at Lincoln County Raceway on race days the option is there if required.
The mechanical breakdown lane is directly infront of the pit crew spectator area and has a gate for access at the outgrid end making access for pit crew quick and easy.


A-track (The Cut-Thru)
The A-track cut-thru is a joining section of track that creates the shorter A-track. This turn becomes Turn 4 of the A-track and leads to Turn 14 of the C-track. This corner is directly opposite turn 4 of the C-track. This is quite a difficult corner on the A-track as it makes the transitions from left to right through the turns quite quick and difficult to judge.
This section of track is commonly used on the roll-up laps of the C-track to save time with smaller fields driving the entire circuit to form up.


B-track
The B-track turns Turn 5 of the C-track into a tight left-hand hairpin corner which goes uphill at an awkward angle. This exit of the corner is very difficult to see, and with the angle of the corner means your turn in at Turn 4 needs to be even tighter to get the kart turned into Turn 5.
The B-track then has a small straight and a sweeping left-hander onto the middle straight just after Harris Bends. It's possible to hold full throttle around this corner which then heads to Turn 14 of the C-track and presents a nice passing opportunity if the run from the turn is right.


Back Straight
The rear straight is an up hill run from Turn 5 (the flip-flop) to Turn 8, although most people consider the back straight to go through to Turn 9. It's up a slight uphill gradient and as such some of the corners along this stretch can be difficult to judge as the track passed the corner can be difficult to see on approach.


Middle Straight
The middle straight is a downhill run from Turn 9 (the hairpin) to Turn 14, through Harris Bends and Turn 13. This is probably the most enjoyable part of the circuit with its combination of speed and turns, however, is a highly important section of the track as it sets up passing moves at Turn 14 and 15 and dictates the speed on the main straight and into Turn 1.
